

I've always liked to cook, but I really love to bake! My Mom often made freshly baked cookies for us when we were growing up and now I equate the smell of warm cookies to comfort, home and smiling kids. The cookies that remind me of my Mom are her Applesauce Chocolate Chip Cookies, Oatmeal Raisin Cookies, Good & Chewy Cookies or Oatmeal Chipper Cookies. She always jokes that she should have blue fur and googly eyes!

I love putting a homemade cookie in my kids' lunches for school and we almost always have cookies on hand for unexpected company, late-night homework sessions or an after-school snack. Making cookies as often as I do has helped me figure out what works best, so I thought I'd share some helpful tips to take your cookies to the next level of AMAZING:)
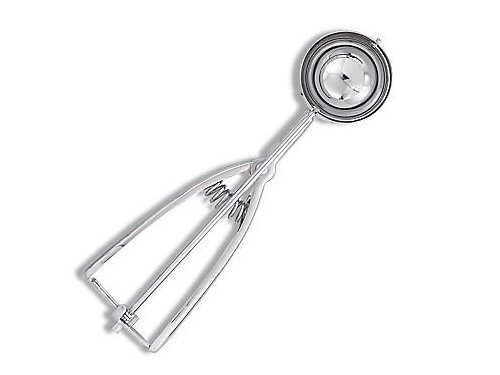
- Use a cookie scoop. This simple tool will make your cookies look uniform in size. I have medium and a small scoops that I love from Pampered Chef, but I've also seen good scoops at Wal-Mart, Target and some grocery stores. My medium cookie scoop is also my secret weapon when making muffins, as it measures the perfect amount of batter for the muffin tin.


- Use parchment paper, if using a metal cookie sheet. It keeps your cookie sheet clean, keeps cookies from sticking and eliminates the need for cooking spray. Costco sells a large roll that will last for years, but you can also find it at the grocery store. Parchment paper is magic as a pan liner when making brownies or bar cookies as well. Simply lift the paper with the baked brownies onto a cutting board and you can easily cut them into neat squares. I also use parchment paper when making a favorite recipe, Oven Omelet Roll.


- My first choice of cookie sheet is actually a baking stone like this one from Pampered Chef (I have nothing to do with the company, but I love several of their products). When I bake multiple batches of cookies, the cookies baked on the stone turn out more uniform, don't burn cookies on the bottom (as metal cookie sheets tend to) and stay softer even longer than cookies baked on a metal sheet.

- Chill the cookie dough, if possible. Even if you stick the cookie dough in the fridge (or freezer!) while you heat up the oven, it will help. Chilled cookie dough holds its shape better and the cookies tend to bake up fluffier and won't go flat.
- Bake cookies in the top half of your oven. In my ovens, I use the second spot from the top for the oven rack. This helps prevent the cookies from burning on the bottom, and speaking of that...
- Always set your oven timer for less time than the recipe says and don't over-bake the cookies. I like to take them out of the oven just before the cookies begin to brown and let them sit on the cookie sheet for 1-2 minutes before removing them with a metal spatula to cool on a cooling rack.
- Let the cookies cool completely before storing them in an airtight container. I use a piece of parchment paper in between the layers of cookies so they don't stick together.


Well, I hope that inspires you to make a hot batch of cookies:) We have
so many good recipes here to try! Happy baking!!!
No comments:
Post a Comment